My moving Canadarm3
Design a moving Canadarm3 with three parts and two degrees of freedom (and learn what degrees of freedom are!).

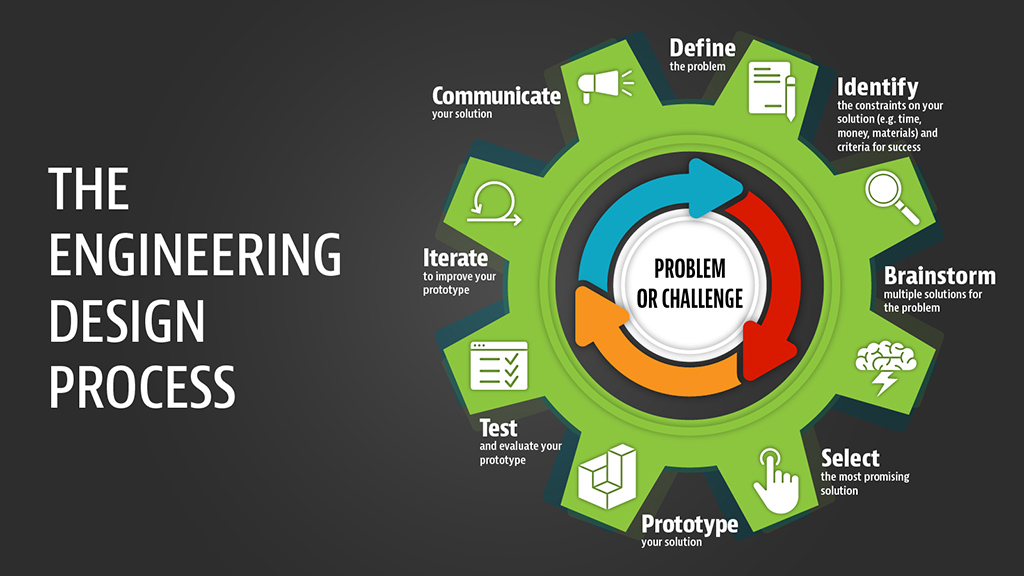
Text version of infographic entitled "The engineering design process"
The engineering design process
- Problem or challenge
- Define the problem
- Identify the constraints on your solution (e.g. time, money, materials) and criteria for success
- Brainstorm multiple solutions for the problem
- Select the most promising solution
- Prototype your solution
- Test and evaluate your prototype
- Iterate to improve your prototype
- Communicate your solution
Infographic entitled "The engineering design process". (Credit: Canadian Space Agency [CSA])
Define
Did you know that Canada is an expert in space robotics? Our country will provide Canadarm3 to the Lunar Gateway, but we also built Canadarm2 for the International Space Station (ISS) and the original Canadarm for the space shuttles, which are now retired. This chart compares the three arms.
These robotic arms have been very important in the space program because they help build, maintain, inspect and repair space equipment. They also help move astronauts in space, and even help catch cargo vehicles docking with the ISS.
Robots are both similar to and different from humans. When we take a close look at the Canadarm, we can see that it has the basic shape of a human arm. But while we have muscles that help us move our arms, robots have motors. Humans have a nervous system that helps tell the muscles when to move; robots have wires. We have brains that help control our bodies and help us decide why and how we should move. Robots have a computer and a computer program that tells them what to do and how to do it.
Think of how your arm moves. What movements can you make (bend, rotate, etc.)? Which ones are more difficult? Which movements are limited, and which ones can you make easily? Could a robotic arm move the same way? Would it require more joints to move the same way? In robotics, a joint (or an axe of motion) is called a degree of freedom.
More about degrees of freedom
Canadarm2 has seven degrees of freedom, which is very similar to a human arm. In other words, it has:
- Three joints in the shoulder (it can roll on both sides and bend up and down)
- One joint in the elbow (to bend just like your elbow)
- Three joints in the wrist (the same as its shoulder)
Try moving your own arm just like Canadarm2 (by the way, Canadarm3 will move the same way too!). What is different between Canadarm2 and your arm? Yes! You have fingers and Canadarm2 doesn't!
Now imagine if we couldn't bend our arms or move our wrists, or have hands with fingers. How would life be different? What are the different body parts that we have as humans that allow our arms and hands to be so useful?
Keep this in mind as you design your moving Canadarm3.
Identify
You will be designing a three-segment robotic arm with two degrees of freedom. This means that your arm will have three parts, two joints, and two of the parts will be able to move independently from one another.
Suggested materials
- Pencils, pencil crayons, crayons, or markers
- A choice of wood sticks, pencils, straws, or straight branches or twigs
- Cardboard, construction paper, or empty cereal box
- Fasteners (elastics, binder clips, brads, pipe cleaners, string, tape, glue, or homemade glue)
- Scissors or cardboard cutters
- Hot glue gun (optional)
- Graph paper or regular paper
- Any repurposed materials you have on hand (plastic bottles, egg cartons, straws or rolled-up recycled paper to make a tube, Popsicle sticks, small twigs, rocks, etc.)
- Variety of paints, coloured paper, tinfoil, or any other materials available to make your arm look awesome!
- Optional: Lego, K'NEX blocks, KEVA blocks

Text version of infographic showing a few cardboard cutting and folding techniques
A few cardboard cutting and folding techniques
- Flange
- L-brace
- Tabs
- Slot + cut
- Slot + tab
- String
A few cardboard cutting and folding techniques. (Credit: CSA)
Brainstorm
- How can we build a robotic arm that can move similarly to our own arm with two degrees of freedom to give it at least two movable parts?
- Position your arm on a tabletop or solid surface. Your goal is to make the tip of your robotic arm be able to touch an object on all its different sides.
- Plan your design with any of the items you have available.
Select
After your brainstorming session, choose an idea you liked and sketch your design before you try to make it. What materials do you have? How will you use them? How will you make the robotic arm joints and link the different parts of the arm together? What will you use to make it move?
Prototype
Here are the steps to make your own Canadarm3.
- Design the first segment of your arm using any available materials.
- Design the second segment of your arm using any available materials.
- Design the third segment of your arm using any available materials.
- Using any method or materials available, create two joints, one at each end of the middle segment of your three-segment arm.
- Attach the parts together and make sure the joints are not too tight so your arm segments can move.
- How will you move the arm? Strings? Elastics? A combination of strings and elastics or something completely different?
You might have to make more than one prototype to ensure that it works well.

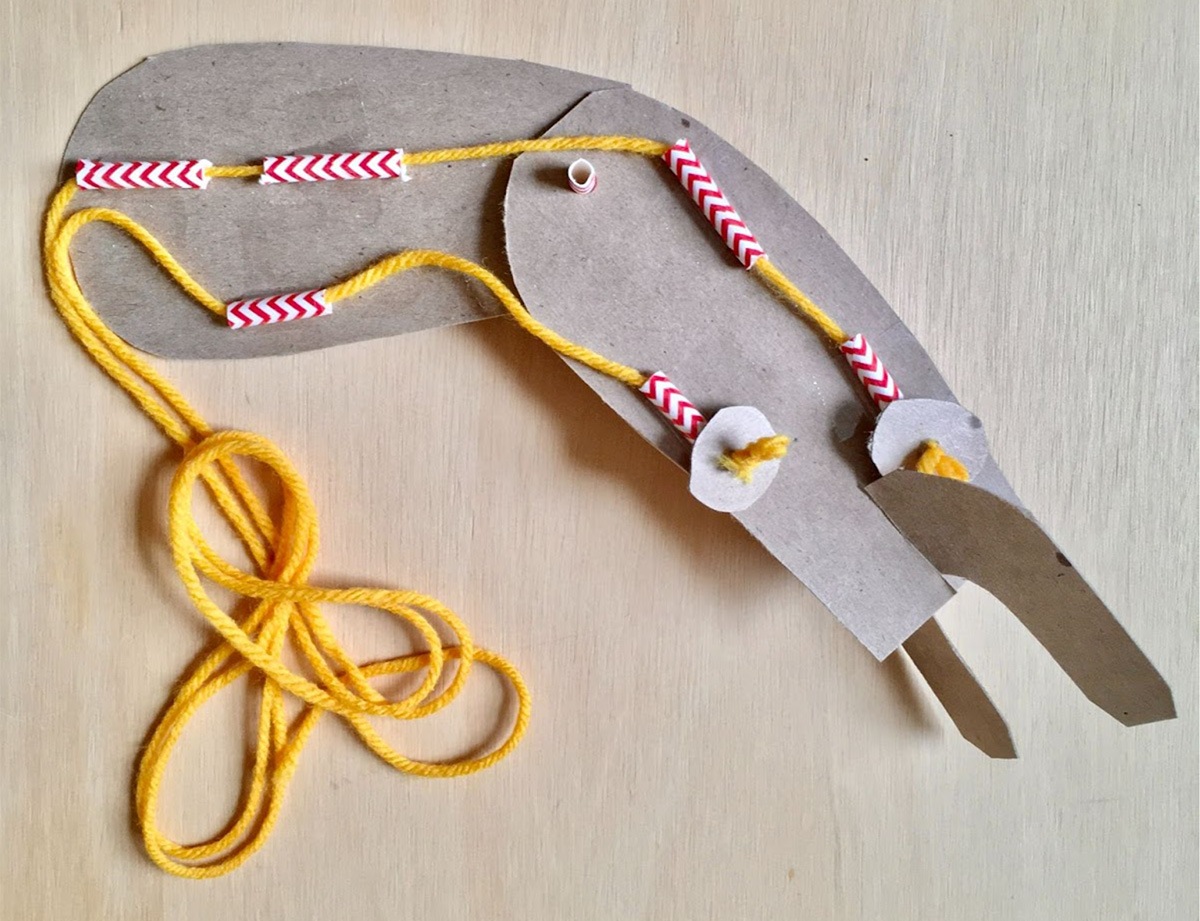
Example of a robotic arm with two degrees of freedom. (Credit: CSA)
Test
Does it work? Can your arm move at least two of its parts? Are you able to touch an object on all sides?
Iterate
- What worked well and what needs improvements?
- In order to have access to your object from every angle, how would you modify your build?
- How could you make it better?
- How could you build it with less material?
- Can you add a third degree of freedom to your arm?
- Are there things you'd do differently if you had more time?
Communicate
- What are the highlights of your robotic arm? Is there something about it you are really excited about?
- Share your project with us. Ask an adult to share a picture on social media and tag the CSA. You never know: a real astronaut might see your creation.
Curriculum links
- Design thinking and the engineering design process
- Critical thinking, problem solving, communication, and collaboration
- Science:
- Simple mechanisms
- Space
- Forces
- Health:
- Dexterity, muscles and body movements
- Math:
- Standard or nonstandard measurement
- Number sense
- Introduction to angles (pre-geometry)
- Technology:
- Robotics
